The isosceles shooting stance is like home base for most shooters. It’s the foundation you return to before anything else. Even elite competitors circle back to it when retraining fundamentals like grip, aim, breath control, trigger discipline, and follow-through.
Sights drifting? Recoil kicking harder than it should? Groupings scattered like you’re drawing a world map? You reset with the isosceles stance and fix what you need to.
Instructors teach it first because it’s simple, and because all shooters need to get it right. Once you’ve mastered the isosceles stance, your platform is solid. You’re ready to refine accuracy, speed, and level up.
When everything else feels complicated, the isosceles shooting stance keeps things simple. It’s a technique we all shooters need to keep fresh. In this guide, we’ll explain what is the isosceles stance, why it’s called that, and when to use it.
What is the Isosceles Stance?
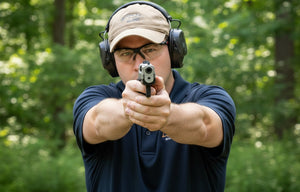
The isosceles stance is when the shooter is square to the target: feet roughly shoulder-width apart, and both arms fully extended straight forward gripping the gun. It’s easy to repeat and quite natural, that’s why instructors use it as the baseline for new shooters.
As simple as this shooting stance is, the name can sound intriguing, especially if you missed geometry class.
Why is the isosceles stance called the isosceles stance? Because your extended arms and chest form an isosceles triangle with the pistol at the apex. You can also imagine a second isosceles formed by your feet and hips. The name just sticks because that triangle helps explain the symmetry and balance of the posture.
When performing the isosceles stance, as your body faces the target or threat squarely, it feels natural and makes good sense under stress. The more you train with it, the better you build other skills on, like sight picture, trigger control, and firearm grip techniques.
But as everything, it serves some purposes better than others. So when to use the isosceles stance? It’s good for:
-
Learning the basics: the go-to stance for beginners practicing fundamentals.
-
Defensive or high-stress scenarios: easy to adopt quickly and maintain under pressure.
-
Close to mid-range engagements: great when quick target acquisition matters more than pinpoint precision, like 5 to 15 yards.ç
-
Range practice & drills: an excellent baseline for working on recoil control, target transitions, and follow-ups.
-
Fatigue management: the balanced posture reduces unnecessary muscle strain during longer sessions. Especially with the modified isosceles, that we’ll see here in short.
-
Resetting fundamentals: when shots go sideways, coming back to isosceles helps you isolate and fix the problem.
There are cases, specially for precision shooting, where going with other stances like the Weaver or Chapman works better. But the isosceles remains the simplest, most reliable tactical shooting stance and foundational shooting posture for most shooters.
That’s why you need to do it right.
How to Perform the Isosceles Stance
Let’s walk through the basic steps:
-
Square up to the target. Face the target with your chest toward it.
-
Feet shoulder-width apart. Keep a natural stance, toes pointing forward or very slightly out.
-
Slight crouch. Bend the knees a little so you’re athletic and ready to absorb recoil.
-
Two-handed grip, full extension. Get a solid two-hand grip, then push both arms out straight so the gun, hands, and chest create that isosceles triangle.
-
Find your sight picture. Align sights on the target, settle a consistent front-sight focus or target-focus depending on the drill.
-
Follow-through. Press the trigger smoothly, hold your sight picture through the shot, then recover for the next one.
Once you’ve got the isosceles stance right, you’re ready for everything that comes next: grip, trigger control, recoil management, and the rest. Whatever you need to focus on, the isosceles stance gets you on the right track.
But even though the isosceles stance feels really natural, it’s not perfect. When you raise both arms and point naturally, many shooters will slightly point toward their support side. It’s subtle, but it shifts your point of aim and can make groups wander.
To fix that small natural point-of-aim issue, let’s give the isosceles stance a twist.
The Modified Isosceles Stance

What you’ll most often see at the range is the modified isosceles. It’s basically an upgrade to the original that adds mobility, helps manage recoil, and lines up your natural point of aim.
Natural point of aim is where your skeleton naturally points the gun when you relax into position, without much muscle effort. The modified isosceles helps you fix that slight shift toward your non-dominant side, so your gun’s muzzle will sit on target without you fighting it.
Here are the key differences on how to do the modified isosceles:
-
Step the dominant-side foot back about 4–5 inches while keeping feet roughly shoulder-width apart.
-
Slight knee flex. Drop into a small athletic crouch to lower your center of gravity.
-
Weight on the balls of the feet. A small forward bias helps you absorb recoil and recover faster.
-
Tiny torso twist. A subtle rotation toward your support side can recentre that natural point of aim.
These little tweaks make the modified isosceles, and all help reduce shoulder fatigue, and also reduce recoil.This means you’ll be able to shoot faster, and more accurately.
All the 45 Blast community knows that recoil is something we care about. Each time we test one of our comps, the isosceles stance is part of the drill. So if you are focused on honing your skills, have you tried them? Go ahead and add a 45 Blast compensator, and practice your favorite isosceles drills with it and without it. You’ll see what we mean.
After all, working on the modified isosceles stance can really help diminish shooter fatigue and get the body mechanics on point.
Isosceles Stance vs. Weaver Stance
Once you learn the isosceles stance, should you learn the Weaver? Not necessary, but usually a good idea. The Weaver can add another tool for accuracy and recoil management.
The Weaver gets a bit more complex: your dominant-side foot steps back and the support-side foot moves forward, so your body is angled to the target. Instead of the straight, squared posture of the isosceles triangle, the Weaver creates a push–pull, full-body position that helps manage recoil mechanically.
We’ve already covered the Weaver shooting stance in full if you want a deep dive. Here’s the short, important comparison:
The Weaver focuses on precision and mechanical recoil control, and also allows quick follow-ups and mobility. That’s why it’s a favorite in competition. The angled position gives an edge against muzzle rise.
But all this doesn’t make Weaver “better” than the isosceles. When you choose to use the isosceles stance or any other, will depend on what for.
Isosceles builds fundamentals and repeatability; Weaver gives you a methodical way to fight recoil and tighten deliberate shots.
That’s why shooters always start with isosceles as their baseline. From there you can progress to Weaver, Chapman, Center Axis Relock, and even the most awkward shooting positions.
Advantages of the Isosceles Stance
There are good reasons shooters keep coming back to the isosceles stance. The Weaver has its place for specialized training, but many officers and pro shooters return to it when they want reliable fundamentals.
Let’s see why the isosceles shooting stance stays so popular:
-
Natural and repeatable. Easy to get into and hold under stress — no time for second-guessing.
-
Fast target acquisition. Facing square to the threat gives a clear sight picture and makes transitions quicker.
-
Balanced body alignment. The bracing angle from extended arms and a square chest gives a solid platform for consistent shots and faster follow-ups.
-
Works with armor. Being squared up plays nicely with body armor and duty rigs.
-
Less fatigue on long strings. The symmetry and slight forward bias cut unnecessary muscle strain, so you can shoot longer without breaking form.
-
A great reset to improve skills. When things go sideways, coming back to iso helps you re-center sight picture, grip, and trigger control.
But what about the disadvantages? Because yes, there sure are some.
The first trade off is that being squared up can make you a larger profile compared to angled stances. Also, the isoscelles stance doesn’t give the same mechanical push–pull recoil control that Weaver-style setups offer.
Still, for defensive, tactical, and general range work, the isosceles is a dependable proper shooting stance and an excellent foundation for building accuracy and confidence. Even precision champions like Nils Jonasson come back to it.
Learning is rarely a straight line to “level up.” Keep coming back to the basics, and they’ll keep paying off.
When to Use the Isosceles Stance?
The isosceles stance works well for self-defense, tactical work, and close encounters. It’s also great for range practice, even if you chase precision in competition.
It’s simple, reliable, and fast to adopt. For beginners it’s the first step for learning sight picture, grip, and trigger control. For experienced shooters it’s the reset: when a drill or target isn’t behaving, come back to iso, clean up your fundamentals, and you’ll usually find the problem.
So, when to use the isosceles stance? Short answer: use it when speed, repeatability, and stress-resilience matter. Think defensive work, dynamic drills, transitional shooting. Basically anytime you need a consistent platform.
You’ll hear people say iso isn’t the best for recoil, and that’s a fair point. But if follow-ups are your weak spot, then our top tier compensators can help you. It cuts muzzle rise and helps you get back on target faster so you can focus on fundamentals.
As we said, the isosceles stance is home base for most shooters. Keep practicing and keep it simple, as it’s the shooting position that marksmen and women return to.