We all struggle with finger discipline at some point. Ask any instructor—they’ll tell you: 10 out of 10 shooters have dealt with it.
The rule “Keep your finger off the trigger until ready to shoot” is one of the most important. Also, one of the toughest gun safety habits to master.
A trigger pull depends on a very subtle movement. The same one we use to type, swipe, or scratch an itch. It feels natural. But when you are handling a firearm, you have got a serious responsibility right at your fingertips.
As simple as it sounds, trigger discipline and trigger control are essential for gun safety, accuracy, and precision. In this article, we’ll break down what they really mean, why they matter, and how to train yourself to improve.
What is Finger Discipline?
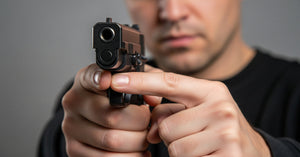
Finger discipline means one thing: when you are holding your gun but not firing, your trigger finger should be straight, extended, and resting along the frame. Definitely not inside the trigger guard.
Why? Because even a slight, unconscious twitch can cause a discharge. And once a round leaves the barrel, there’s no bringing it back.
Trigger discipline sounds simple, but it’s surprisingly easy to forget, especially in casual or non-shooting moments. Maybe you are inspecting your pistol, loading it into a case, or simply showing it to a buddy, finger control is the first rule of safe gun handling.
For instance, what’s the right way to pick up a gun when you are not in a shooting situation? Use your thumb and your three grip fingers. Your index finger stays off the trigger and rests on the frame. That’s proper finger placement 101.
If you wrap your finger around the trigger out of habit, you risk an accidental flex, and that’s something no one wants. That’s why in the gun community we emphasize this all the time: if you are not shooting, your finger stays high and straight, resting along the side of the frame just above the trigger guard.
Perhaps you have noted some variations, or overheard a discussion on how to place your trigger finger when not shooting. Let’s see what we got.
Straight Finger Placement vs Bent-C Trigger Placement
When we talk finger discipline, we are talking straight finger placement: Your index finger should be fully extended and resting along the frame, just above the trigger guard.
You may have seen or heard some shooters mention Bent-C placement. This means curling the trigger finger slightly, creating a “C” shape while keeping it high along the frame. It’s a ready position used when you are actively preparing to shoot.
So, to be crystal clear: for any non-shooting situation, always go with straight finger placement. The Bent-C is an action-ready variation, not a safety default.
Trigger Discipline vs. Trigger Control
Trigger discipline is building the habit of keeping your finger outside the trigger guard until you are 100% ready to fire. And as you build that habit, comes the next step: train that trigger pull.
Trigger control is pure shooting technique. It means applying smooth, consistent pressure on the trigger until the shot breaks, without disrupting your sight alignment. Trigger control is what leads to tighter groupings, better accuracy, and real precision shooting.
While trigger finger discipline and trigger control are different, they go hand in hand. The more precise your finger control and muscle memory, the safer and more accurate you’ll be overall. That’s how you go from just handling a gun to becoming a marksman.
The Risks of Poor Finger Discipline
Think about how little it takes to pull a trigger: just a few ounces of pressure. That’s why there’s an old saying in the gun world: “There’s a lawyer attached to every bullet.”
When you press that trigger, you are making a serious decision, with both safety and legal consequences. That’s why finger discipline is both about habits and responsibility.
So, when shouldn’t your finger be on the trigger? Pretty much any time you are not actively firing. Here's where trigger discipline matters most:
-
When inspecting your firearm (like checking if it’s unloaded)
-
When loading or reloading a magazine
-
When cleaning your gun
-
When handling or showing your gun to a friend
-
When filming a review, unboxing, or demo for YouTube or social media
Are there exceptions? Yes, but only when it’s 100% safe. For instance, when inspecting your trigger, showing how it functions, or feeling the pull. All this, only after clearing the gun and confirming it’s unloaded.
Another safe scenario is during dry fire practice or gun training sessions, where you are intentionally working on trigger control in a safe setting.
How to Practice Finger Discipline

We have all been there, right? That beginner moment holding a plastic training gun, thinking, “Great, I got a kid’s toy.” But you quickly learn these aren’t toys, they are tools to build safe habits.
Dummy guns are completely safe for practice, but as the rule goes, “Treat every gun as if it’s loaded.” That mindset kicks in early. And once you move on to real gear, your finger control training keeps going strong.
Let’s dive into five drills that help you master trigger discipline and control:
Finger Trigger Placement Dry Fire Drill
This is a great drill to help you see if your finger placement is throwing off your shots. You start dry firing at a target. Aim, get a clean sight picture, and pull the trigger naturally. Did the sights drift?
-
If your shot pulls inward, your finger is probably too far toward the tip.
-
If it pushes outward, your finger is likely too deep on the trigger.
Here is what this trigger finger drill can tell you:
-
Tip of your finger: not enough control, often pulls inward
-
Middle of the pad: ideal placement for smooth, straight trigger pulls
-
First knuckle: too much force, often pushes outward
Wall Dry Fire Drill
This is one of the most popular trigger control exercises, as it teaches you to feel the trigger wall. Here is how to do it:
Place your finger on the trigger and slowly apply pressure until you feel resistance—that’s your wall. Hold there. Then continue through for the full press and dry fire.
The Wall Dry Fire Drill helps you understand two things: how much movement it takes to reach the wall; and how much pressure it takes to break through it
Trigger Reset Drill
This drill is the perfect practice for follow-up shots and rapid-fire accuracy. What you need to do is fire a shot (live or dry fire), but keep the trigger fully pressed. Then, slowly release it until you hear or feel the reset click. From there, fire again.
This drill trains you to ride the reset, which is essential for fast, controlled follow-ups. Definitely a great drill for competitive, tactical and self-defense.
Rolling Live Fire Drill
This drill helps reduce flinching and jerky movements. Think of it like a controlled trigger slap, but smoother. Pull the trigger all the way through at a steady pace, without staging or pausing at the wall.
The key is keeping it consistent. The rolling drill trains you to shoot with confidence without anticipating the break, which often causes flinches.
Double Live & Dry Fire Drill
And speaking about anticipation, this is the ultimate drill to catch flinch in action. Here’s how the double live & dry fire drill works:
-
Load your pistol with one round.
-
Rack the slide.
-
Remove the magazine.
-
Take a well-aimed live shot.
-
Since the mag is out, the gun won’t reload—so the next press is a dry fire.
That second shot reveals a lot. If you flinch or jerk the trigger during the dry fire, you’ll see it clearly, no bang to cover it up.
It’s one of the best drills to build trigger discipline, break bad habits, and improve your control under pressure.
Essential Features & Accessories
So far, we have made one thing clear: the most important factor in trigger discipline is you. Your training, your habits, your awareness. It’s all about being a responsible, focused shooter.
That said, your gear matters too.
A good trigger is a top priority for any firearm. And if you are a Canik fan like us, you are already set—every TP9 model comes with one of the best factory triggers in the game.
Other gun features that support finger control and trigger safety include:
-
Trigger Guards: Yes, this one might sound obvious, but it’s essential. A properly-sized trigger guard helps prevent accidental contact and keeps your finger where it should be—off the trigger until you are ready.
-
Trigger Safeties: These prevent the trigger from moving unless you intentionally engage it. Some shooters prefer them, others don’t. Either way, don’t rely solely on them, trigger discipline should always come first.
Also, there are specific accessories that help protect the trigger on your pistol:
Trigger Guard Holsters
We have got some great Yedi Holsters at 45 Blast you should check out. Our holsters offer 100% trigger guard coverage and a perfect fit for your Canik handgun. Comfortable, breathable, and always ready—just like you.
Trigger Block Inserts
Great for dry fire practice, these tools block the trigger from moving. That way, you can train safely without the risk of accidental discharge.
Good gear and good practice, that’s how shooters go good to great.
Fast Shot or Trigger Discipline?
Here’s our take: before speed, build good habits. That’s your marksmanship foundation. First, you learn your trigger, then you train for speed.
Understanding how your pistol’s trigger breaks, resets, and stages is critical. But the real key? Trigger discipline is about you. It’s about building the kind of muscle memory that puts your finger exactly where it needs to be every time.
-
Off the trigger when handling.
-
On the trigger only when you are ready to shoot.
Once that becomes second nature, fast and accurate shots will follow. The more you refine your trigger control, the more natural it feels—under pressure, at the range, or in competition.
We hope you found this guide helpful. If you did, hit us up on Instagram or swing by our eShop to check out our gear. We have got the trigger-guard-covered 45 Blast holsters to help you shoot safer, smoother, and sharper.
Until next time—debrief complete.